Many people are curious about custom insoles: why are they several times more expensive than regular ones? Are they really worth the investment? And how exactly are they made?
Today, let’s walk you through the complete process of creating a pair of custom insoles—from 3D scanning all the way to a truly personalized fit under your feet.
Step 1: Foot Assessment and Consultation
Before anything is done, it all starts with a conversation.
A foot specialist or podiatrist will conduct a thorough consultation to understand your needs: Do you walk with an outward gait? Do you suffer from persistent heel pain? Do you have flat feet, overpronation, or supination?
These issues directly affect how the insoles should be designed. In short, the goal isn’t just to make a “comfortable” insole—it’s to create one that helps correct and support your foot structure.
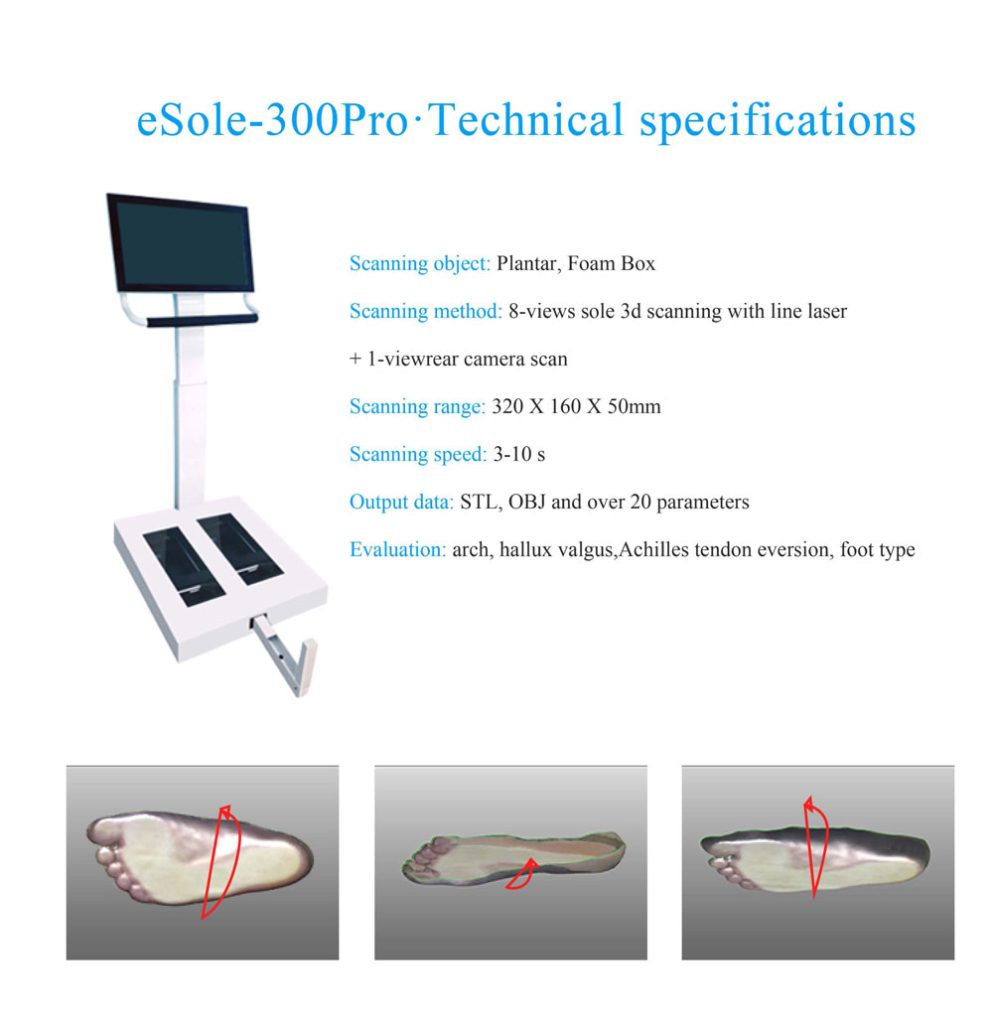
Step 2: 3D Foot Scanning and Modeling
The 3D foot scan is the core of the customization process.
You’ll stand barefoot on a specialized scanning platform. Using infrared or laser technology, a 3D image of your foot is captured, collecting key data such as arch height, pressure distribution, and load points at the forefoot and heel.
This data is then uploaded into professional software, which generates a detailed personalized foot model.
This model is the foundation of your custom insole.
Step 3: Personalized Insole Design
With the 3D model in hand, technicians can begin designing the insole structure according to your specific needs:
Do you need extra arch support?
Should the heel area be reinforced?
Is there a height difference between your feet that needs correcting?
Which areas need cushioning, and which need firm support?
Every detail is tailored to your unique foot shape—not a one-size-fits-all approach.
Step 4: Material Selection and Precision Manufacturing
Once the design is finalized, it’s time for production.
Technicians select a suitable combination of materials—some areas may require firm, supportive material, while others need softer, shock-absorbing layers.
Using CNC machines or 3D printers, the insoles are then precisely cut and formed based on the digital design. The typical production tolerance is within 1 millimeter, ensuring a perfect fit.
Each layer is carefully assembled, polished, and bonded to match the contours of your feet.
Step 5: Fitting and Fine-Tuning
After the insoles are made, the process isn’t over yet. You’ll go through a fitting session.
You’ll walk a few steps with the new insoles while a specialist observes your gait and pressure distribution. If there’s any discomfort, they’ll make on-the-spot adjustments—such as trimming the edges or altering the arch angle.
At high-end clinics, they might even engrave your name or a serial number onto the insole, making it truly exclusive and personalized.
From data to design to delivery, custom insoles are more than just footbeds—they’re a fusion of medical insight, biomechanics, and advanced manufacturing. Now you know why they’re worth it.
